Monday, May 20, 2013

A Blue Baby Shower.

Here are some more pictures from the blue baby shower.
The blue dessert table.
Blue Lollipop Favors.
Blue punch and cucumber water.
Food table.
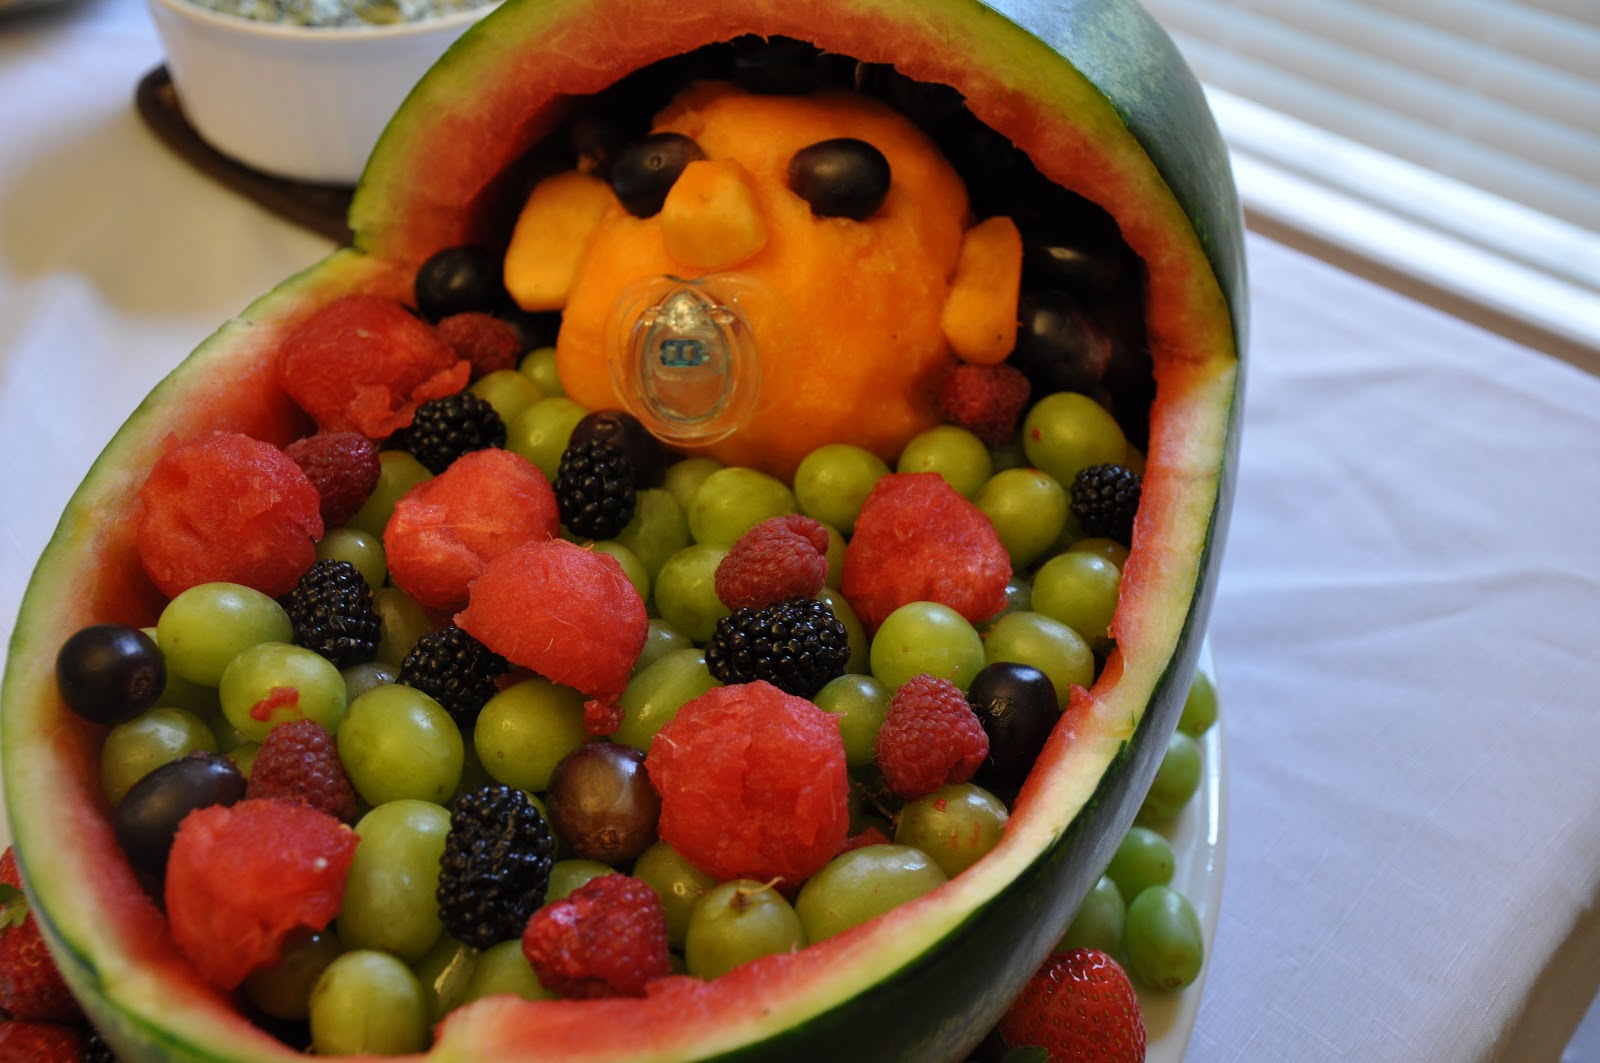
Look at this cute fruit bowl one of my co-hosts made.
Isn’t is adorable?!

I just hosted a pink baby shower so I will have pictures posted soon!


Wednesday, May 15, 2013

Cupcake Toppers for a Blue Baby Shower.

For the blue baby shower I hosted for my dear friend, I decided to make cupcake toppers to decorate the cupcakes with. These were really easy to make. She had already chosen her baby boy’s name so I was able to incorporate his name into my toppers.
To make the cupcake toppers, I printed the letter “G” and the name “Garrett” in blue, size 48 font, leaving space in between the letters and words so that there would be room for the circles. Then I used a scalloped edge 1 ½ inch round punch and punched out all of the letters and names. Next, I used a 2 inch round punch and punched out the background circles in blue cardstock. Then I attached the small circles to the blue cardstock. I used a non-toxic glue stick. Once those were dry, I attached the lollipop stick to the circle. I used regular non-toxic school glue for this. The tricky party is being sure that the stick is lined up correctly with the letter/name on the circle so the letter/name would be straight when it went into the cupcake.
I decided to make my cupcake toppers two sided since my dessert table was set up so that people could walk around the table and I didn’t want the backside of the cupcakes to be undecorated. To do this, I simply punched out double the letters, names and blue circles. Once the first circle had been attached to the stick and the glue dried, I simply turned it over and added the second circle.
Then I pushed them into the center of the cupcakes for an adorable and personalized decoration!
Enjoy!


Friday, May 10, 2013

Diaper Wreath.

I hosted a baby shower for a dear friend a few months back. I usually make diaper cakes for baby showers but this time around I decided to make a diaper wreath instead. This was actually very easy and I was so pleased with how it turned out.
This is what you will need:
·         Diapers- I used about 36 size one diapers. I used the Target brand diapers that had blue, green and gray stars since the diapers would be seen but you can choose any brand/pattern that works for you.
·         One metal wreath form.  You can do any size that you like. I opted for a 20 inch one.
·         Ribbon for attaching the diapers to the wreath. You could also use rubber bands.
·         Tulle/Ribbon for decorating and bow.
First, wrap the diaper around the wreath form so that the wreath form is inside the diaper. The top of the diaper should be on the outer ring of the wreath and the bottom of the diaper should be on the inner ring. Gather the top of the diaper together and secure with a ribbon. Repeat with each diaper, slightly overlapping the next diaper over the last one added.
Once all of the diapers have been added the wreath form should not be visible and it will look like this (pardon the mess on my table!):
Now comes the decoration part. I used two different colors of blue tulle to wrap around the diapers to cover up the ribbons used to secure them to the wreath form. I simply took one color and wrapped it over one diaper and then under the next, all the way around the wreath. With the second color, I wrapped it over the remaining diapers and under the diapers with the first color on top.
Once  both colors are added it should look like this. 
 Next, I added a tulle bow.
Here’s the finished product hanging on my front door with a sign with the baby’s name in the middle.
I wish I would have made the sign a little bit bigger but I didn’t realize how small it looked with the giant wreath until about 10 minutes before everyone arrived. Oops! I’ll do better next time!
Enjoy!

Wednesday, April 24, 2013

Peanut Butter Cup Cupcakes.

Peanut butter cups are one of my favorite desserts. So when we had cupcakes at a recent work event and I was excited when I saw peanut butter cup cupcakes on the dessert table. But I found the peanut butter cup cupcake to be disappointing. It was very dry and lacked any real chocolate or peanut butter flavor. In the following days, I just couldn’t get that subpar cupcake out of my mind. Sad, isn’t it? So I decided that I could do better and set out to make an extraordinary peanut butter cup cupcake.
As soon as I saw this recipe on Two Peas that included a full peanut butter cup in the cupcake, I knew my cupcake mission would be a success. I used their peanut butter frosting recipe as well. I love Hershey's “Perfectly Chocolate” Chocolate Cake recipe so I used that in place of the one in the Two Peas’ recipe. Really any chocolate cupcake recipe, or even a cake mix, will work. These do take a bit of time to assemble but it is well worth it.
 So how do you get that full size peanut butter cup in the cupcake?
Simply pour a small scoop of batter into each cupcake liner, place the peanut butter cup butter on top of the batter and then add remaining batter to the cupcake liner, covering the peanut butter cup.
Bake the cupcakes according to your cupcake recipe. Mine were in the oven for 20 minutes. When you take them out of the oven, they look like normal chocolate cupcakes.
I just got a new cupcake carrier. Isn’t this so neat?
It's easy to carry and I really like how the holders stack together.
Once the cupcakes are cool, mix up your frosting and try not to eat it all.  
I made about 30 cupcakes to take to work and this frosting recipe made enough for all of my cupcakes. Although, I’m a fan of mounds of icing on cupcakes so if you are more liberal with your frosting you might need to double the recipe, depending on the number of cupcakes you make.
Don’t these look delicious?!?!
There wasn’t a single cupcake left when I took these to work. That’s always a good indication of whether a new recipe was a success. Mission accomplished!
Enjoy!

Peanut Butter Cup Cupcakes
Adapted from Two Peas


Full size peanut butter cups, unwrapped (one for each cupcake)
Chocolate cupcake batter (see recipe below)
Peanut butter frosting (see recipe below)
Mini peanut butter cups for garnish, if desired
 
Preheat oven to 350 degrees and line a muffin pan with cupcake liners. Pour a spoonful of batter into prepared cupcake liners. Place full size peanut butter cup in the cupcake liner and then add remaining batter, filling cups 2/3 full with batter.   Bake 22 to 25 minutes.
Once completely cooled, frost the cupcake with peanut butter frosting. Top each cupcake with a mini peanut butter cup if desired.

Hershey's “Perfectly Chocolate” Chocolate Cake
Makes about 30 cupcakes


2 cups sugar
1-3/4 cups all-purpose flour
3/4 cup cocoa
1-1/2 teaspoons baking powder
1-1/2 teaspoons baking soda
1 teaspoon salt
2  eggs
1 cup milk
1/2 cup vegetable oil
2 teaspoons vanilla extract
1 cup boiling water
Stir together sugar, flour, cocoa, baking powder, baking soda and salt in large bowl. Add eggs, milk, oil and vanilla; beat on medium speed of mixer 2 minutes. Stir in boiling water (batter will be thin).

For the Peanut Butter Frosting from Two Peas:
1 cup unsalted butter, at room temperature
1 cup of cream peanut butter
2 1/2 cups powdered sugar
1 tablespoon heavy cream
In the bowl of a stand mixer, beat butter and peanut butter until creamy. On low speed, add in powdered sugar. Mix until combined and add the heavy cream. Mix until frosting is fluffy.

Friday, April 19, 2013

Smoothie Popsicles.

I have a smoothie obsessed toddler at my house. He is constantly requesting them. While I’m pretty sure that he would drink a smoothie any time of day, I have limited them to breakfast time only.  I am a big fan of smoothies at breakfast because it allows me to pack a lot of nutrients into a cup and makes for a quick breakfast. In fact, Monday mornings are always the most rushed at our house so Mondays are designated smoothie days.
Some mornings he will drink more of his smoothie than others so I occasionally find myself with leftover smoothie. I hated to waste all that goodness. So I’ve started making smoothie popsicles. I have a set of popsicle molds so I simply pour the leftover smoothie into the popsicle molds and place the molds in the freezer. Then we have delicious and nutritious frozen treats, in a variety of flavors that we can enjoy later.
Now that the warmer weather is just around the corner, I’m looking forward to enjoying these frozen treats on our back deck after dinner.

Monday, April 15, 2013

NYC.

My sweet husband recently took me on a weekend getaway to NYC. I love that city. It has such a special place in my heart as that’s where my husband was living when we first met. I met him randomly one weekend, when he was back home in Arkansas visiting his family and friends. At the time, I was still in law school. The first time I went to visit him was during the break in between the spring and summer semesters so I was able to stay an entire week. He took me to all the normal touristy locations but we also spent hours just walking around the city and sitting in parks watching people. By the end of that week, I was in love with the city (and the man that would soon after become my husband). Not long after my first visit, he got an amazing job offer in Arkansas and decided it was time to move back and I was overjoyed that he would be in the same city as me after so many months living apart.
Since then, we’ve tried to go back at least once or twice a year. The city has such an amazing energy. There is always something new to do or see or eat!
Here are just a few snapshots from our recent trip:


One of the best sandwiches I’ve ever eaten- the Lobster Roll at Pearl.

Got to have pizza in NYC! This is from my favorite place for pizza, John's Pizzeria on Bleeker Street.


Friday, April 12, 2013

Home remedy for upset stomach.

I recently suffered through a terrible stomach bug that lasted about 7 days. During this bout of sickness my mom reminded me of one of my Grandma J.’s home remedies for an upset stomach- drinking warm jello. I know it probably sounds strange but at least in my experience it really does help. Basically, you mix up the jello like you would if you were making it normally but instead of letting it get firm, you drink it. My Grandma J.’s always said that the jello coats your stomach (or throat), which will help to calm it down. I think that sometimes it just helps to get something of substance in your stomach and this does just that. My Grandma J. gave this to my mom and uncle when they were growing up and my mom always made it for me and my brother when we were sick.
This is very easy to make: Add desired amount of water to a coffee cup and microwave until warm, approximately 1 – 1 ½ minutes (time will vary depending on amount of water used). Then add 2-3 tablespoons of your favorite flavor of jello mix and stir until combined. Strawberry has always been my favorite.
The next time you or a loved one are sick, give this a try!